

Testing Frontend Applications: User Story 1 - Testing app initial load (Part 3B)
Tests to carry out the first time user loads our application


- #1: Introduction
- #2: Setting up Next.js Project for testing
- #3: Writing the tests
- #3A: What should I test?
- #3B: Testing App Initial Load (i.e This article 😁)
- #3C: User can create a post
- #3D: User can edit a post
- #3E: User can delete a post
- #3F: Snapshot Tests and Conclusion
- #4: Are my tests enough?
Application we are testing: Post Feed Application
GitHub repository: Post Feed Application Code
Without wasting much time let's get right to it. To easily point out the line in the code I am explaining, I would be making use of a tool called Carbon.
We have outlined what we want to test, and why we want to test it in our previous article so If you haven't checked that out, I suggest you do so, as it would definitely give you more insights as to why certain decisions are going to be taken in this article. What should I test? Part A
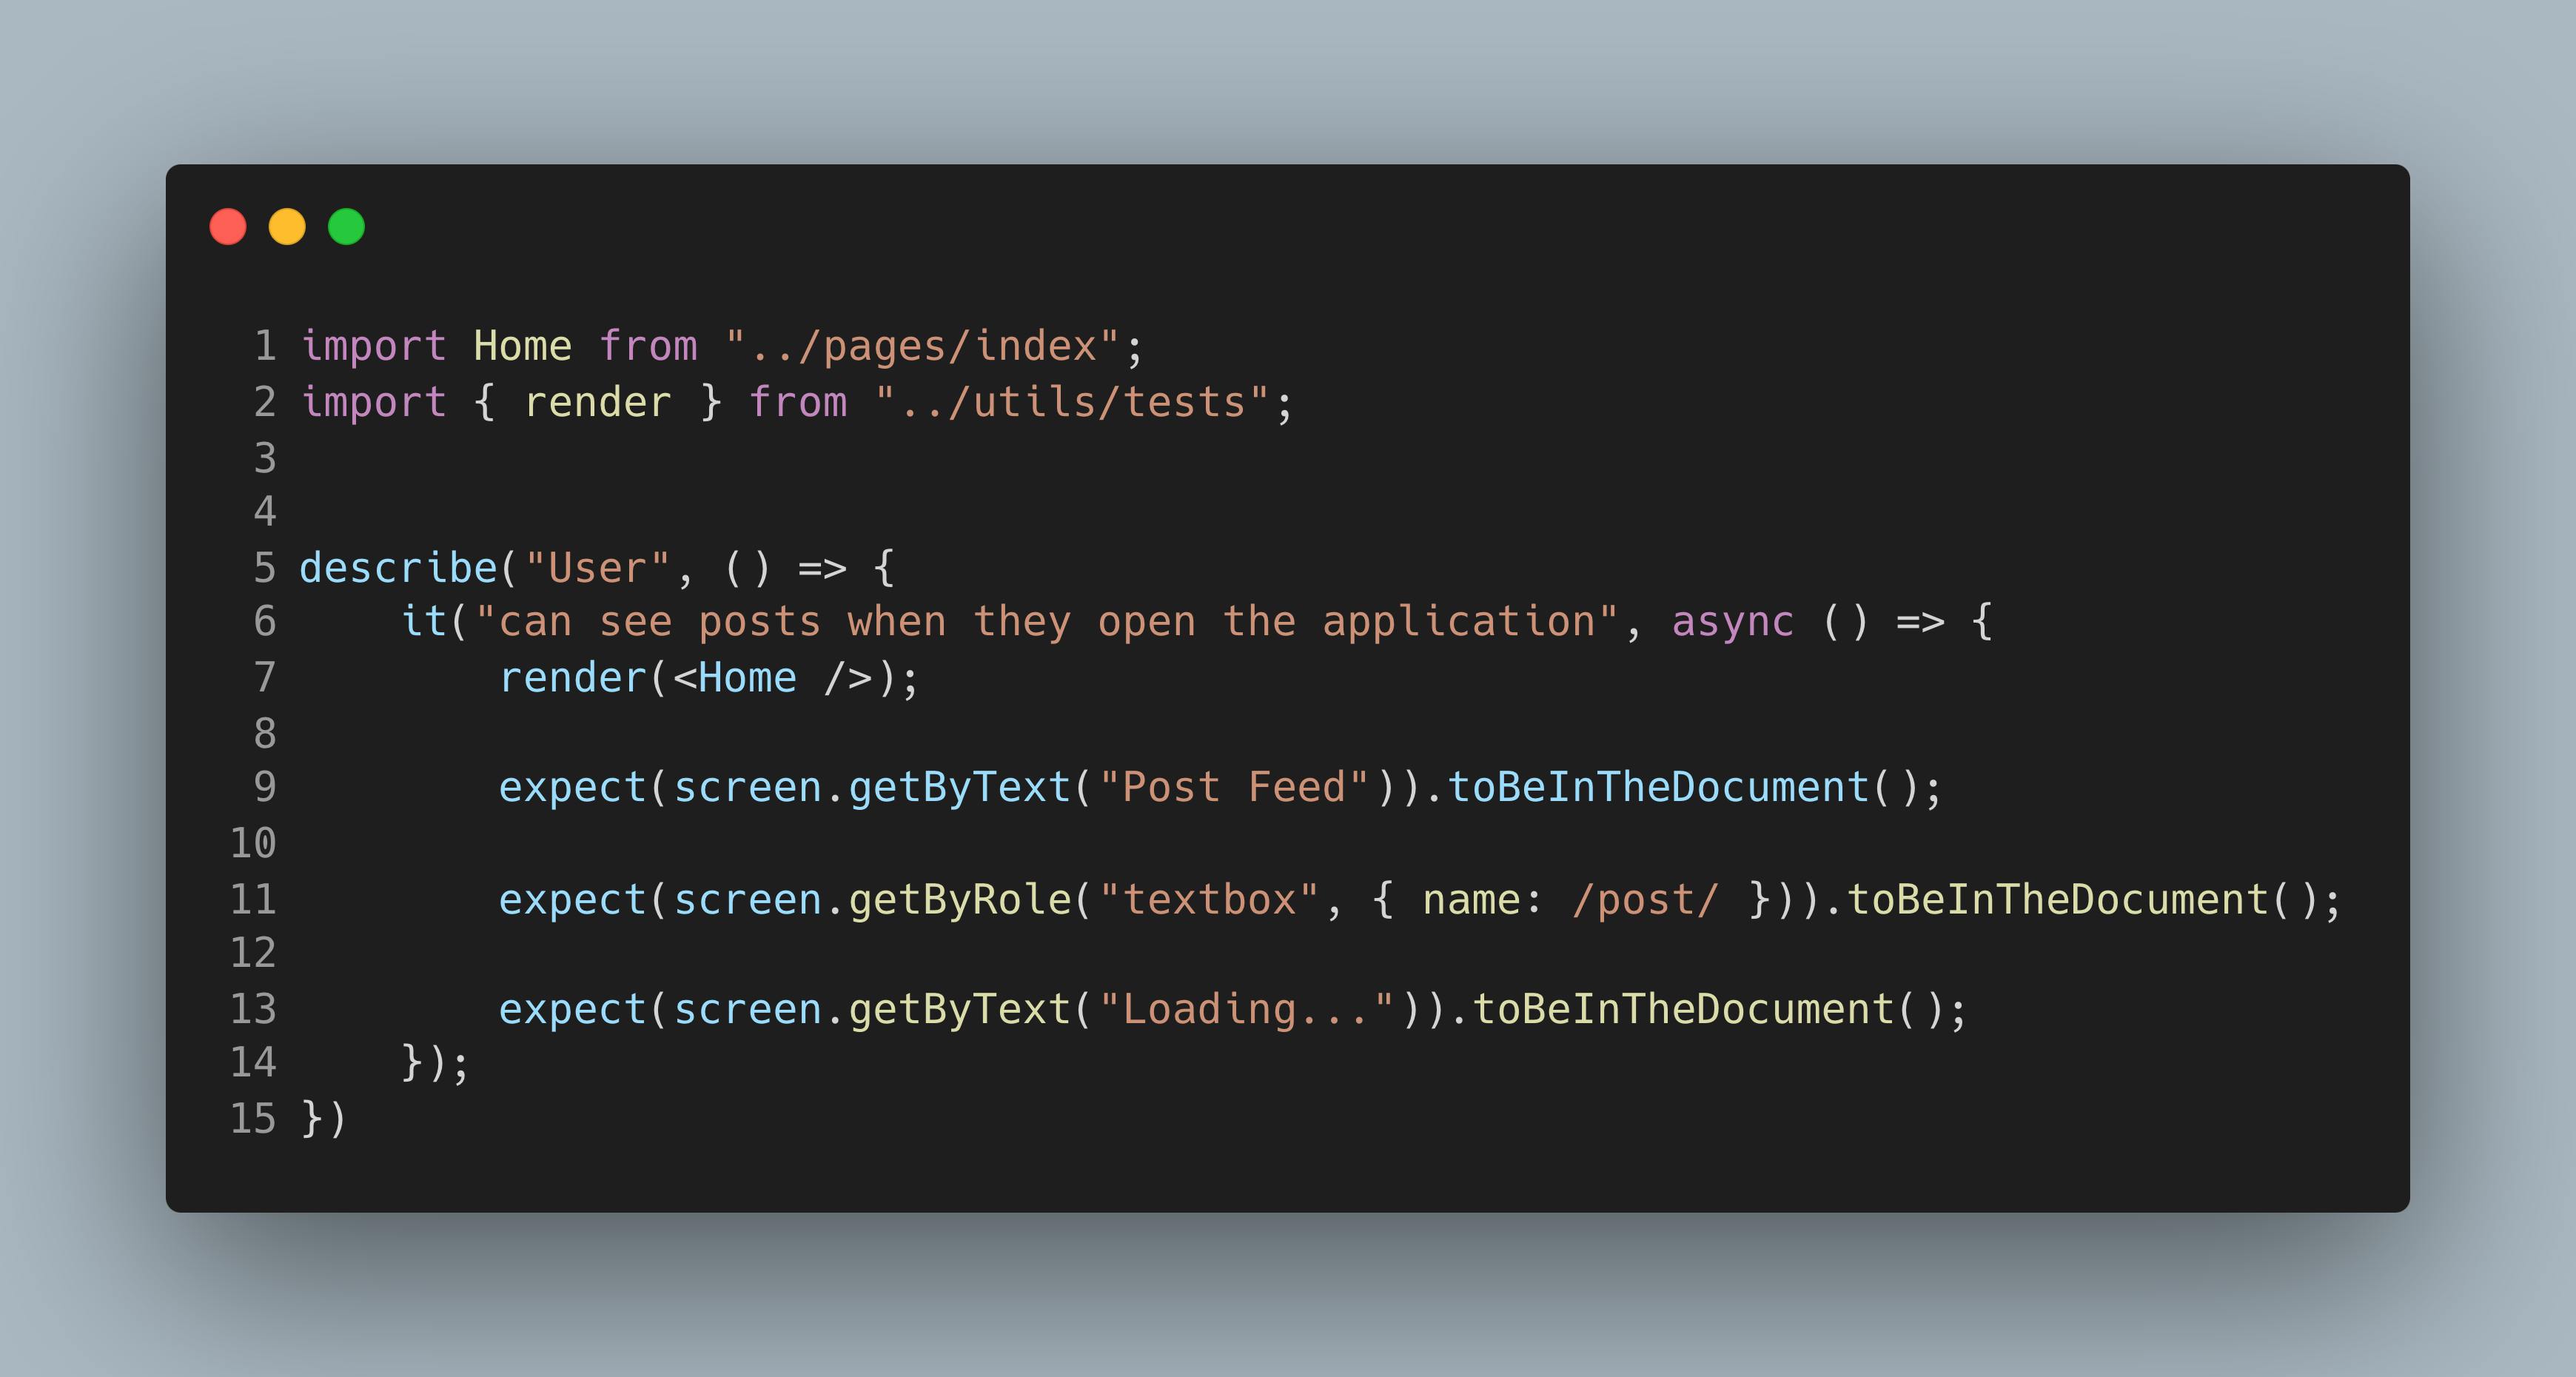
Structure before network request resolves
Line 1 : We import the component we like to test
Line 2 : We import the react testing library render method; it is what we would use to render our component on the jest dom. I will explain where we are importing it from (i.e ../utils/test) shortly. However, you can see the utils/test.tsx file here
Line 5 : We create a block to group our tests using describe, thereafter we give it a short description "User"
Line 6 : We create another block which would contain an individual test using it keyword and also give it a short description "can see posts when they open the application".
When our tests run, our console would append the description in the describe block to that in the it block, which would then output a full description that reads User can see posts when they open the application. This makes it very easy for us to identify which tests fail or pass from simply looking at the description in our console.
You would notice that the second parameter of the it block which is a function, has the async keyword. I would explain why shortly.
Line 7 : We render our component
Line 9 : We check to make sure that the text "Post Feed" is in the document using the screen.getByText query
Line 11 : We check that an input with the name "post" is also in the document. Here we use the screen.getByRole query.
When it comes to which query (i.e what we use to select our elements) to use to write tests , always try as much as possible to go for the accessible queries. You can see the priority of which query to use here
Using getByRole ensures that we are testing our app in an accessible way, which in turn, means that screen readers would also be able to detect what we are testing.
By default, any html element that allows input (e.g input, textbox) is given a default role of textbox by the browser. see here.
Line 13 : We check that a text "Loading..." is in the document
These are the initial checks we do to ensure that the default display of our application is as we expect.
Structure during and after network request resolves
Next, we need to check that the loading text disappears and we can now see a list of posts. We know that when we see the loading text in our application, a network request is being made. However when writing tests, we usually do not want to make an actual network request but instead mock the network requests. This gives rise to two important questions:
What does it mean to mock a network request?
In English, to mock something simply means to make a copy of it that is not actually real. It is usually used to simulate the real experience, e.g a mock examination. Therefore, mocking network requests simply means making a network request that is not actually real but simulates the real experience.
Why do we mock network requests?
- Reduce the time taken for our tests to run.
When we run our tests without mocking network requests, an actual API call is made to our backend server and this could take time - depending on when the response comes from our server. We do not need to waste this time since we already know the structure of data our backend ought to return.
- Testing in a predictable environment makes us write better tests
To the best of our ability, we always want to test in a predictable environment. We know that an API call to the backend could either resolve successfully or fail. Knowing these two states, we can simply write tests to suite their response.
We would be using axios for our network requests, so let's create a simple axios mock. These days, it's more adviceable to just simply use Mock Service Worker rather than create your own mocks. However at this point in our application we will just create our own mock since it is very simple.
Open the command line and run this command to create a mocks folder in the root of your app.
mkdir __mocks__
By default, jest goes through our app and automatically detects any file inside the __mocks__ folder as a mock. See resource
Next, we create an axios mock file inside the mocks folder we just created. Go to the root folder of your application and run
touch __mocks__/axios.js
Now all we need to do is fill up our axios mock file with the following:
const axios = {
    get: jest.fn().mockResolvedValue({ data: [] }),
    post: jest.fn().mockResolvedValue({ data: [] }),
    delete: jest.fn().mockResolvedValue({ data: [] }),
    put: jest.fn().mockResolvedValue({ data: [] }),
};

export default axios;
What are we doing in this file?
We create an object containing the four axios methods we will be using in our application. In each of them, we map their keys to a jest function(i.e jest.fn()), then we create the resolved value we want for a request that matches any of our keys using mockResolvedValue. For no particular reason, we just put in an object with a data field. Place whatever you want the result of your axios call to be as an argument to mockResolvedValue. Whenever axios detects a call with that particular method (i.e get/post/delete/put) it would return whatever argument was passed into mockResolvedValue.
Now let's modify our initial test to accommodate the network request that occurs when the loading text is on the user's screen.
We have modified our test by adding some new lines so let me explain what is going on.
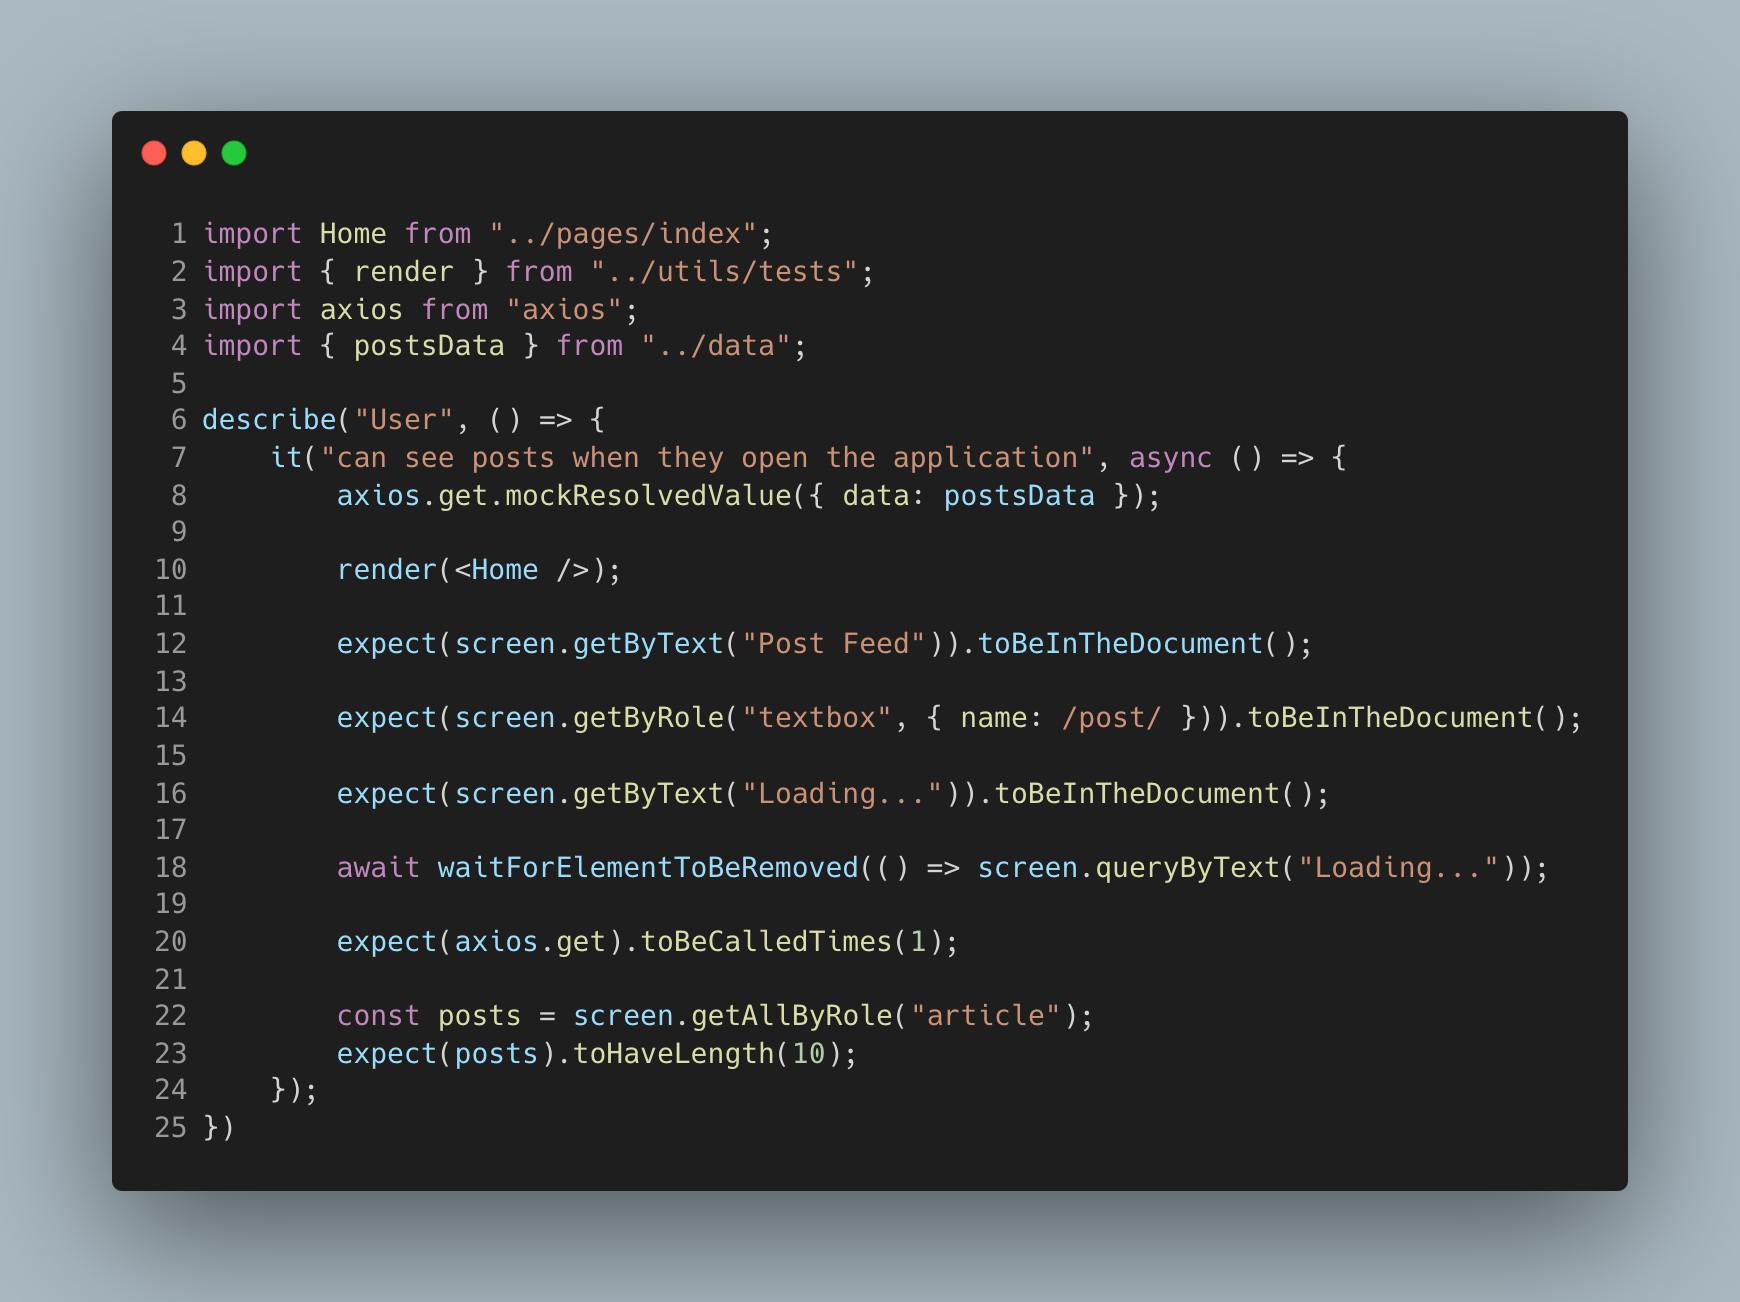
Line 3 : We import axios which we would be using for our network requests.
Line 4 : We import some data. This data would be the value we "assume" our backend would return if an API call is successful. Only the "structure" of the data has to be the same, the values can be anything.
On the initial start of our application an axios get call is made. Jest intelligently goes through the __mocks__ folder to see if there is a mock for our axios call. Since one exists, jest intercepts the real axios call with our mock axios call and immediately returns what we passed into our mockResolvedValue in our mock file. In our axios mock file, we returned a resolved value of an object with a data key being mapped to an empty array, but since we don't want an empty array returned in our actual test, we need to override the default axios.get.mockResolvedValue in our mock file. That is exactly what we are doing in Line 8. Instead of returning an empty array we are returning a list of data we call postData. You can see our postData here
Line 8 : We make sure that the response of our get request is our post data
Line 18 : We wait for the element with the text "Loading..." to be removed from the document by using the waitForElementToBeRemoved helper function, which is asynchronous (hence the need for the await keyword).
Line 20 : We check that the axios.get function has been called
Line 23 : We then assert that we can now see 10 posts on the document. We retrieve all elements that have the article role (recall that we are using accessible queries)
🎉 We have successfully tested the initial loading of our application
Let's move on to testing post creation